A small command line utility to convert PNG images
to GBDK or RGBDS
compliant Game Boy tiles. Tiles are generated as C unsigned char arrays for
GBDK tiles, and an array of byte literals in ROM for RGBDS tiles.
Takes input like:
That you can use in your Game Boy programs like:
Install cargo, and rust
cargo install gbtile
$ git clone git@github.com:blakesmith/gbtile.git
$ cd gbtile/
$ cargo install --path .
The gbtile executable will be installed in $HOME/.cargo/bin/ by default.
Gameboy Tile Generator 0.2.0 Blake Smith blakesmith0@gmail.com Generate GBDK or RGBDS Game Boy tiles from PNG images
``` USAGE: gbtile [FLAGS] [OPTIONS] -i -o
FLAGS: -d Enable debug logging -h, --help Prints help information -V, --version Prints version information
OPTIONS: -i The PNG image to generate tiles from. Example: 'image.png' -o
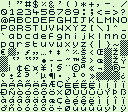
Find an image that matches the image criteria below, or make your own in your favorite photo editor, then convert it like so:
$ gbtile -t gbdk -i ascii.png -o ascii.tile.h
2020-05-19 21:07:02,154 INFO  [gbtile] File: ascii.png, Tile rows: 14,
columns: 16, unique colors: 2
Make sure the tile count and unique colors match your expectations. The output will be a valid C array like so:
c
unsigned char ascii[] = {
    0x00,0x00,0x00,0x00,0x00,0x00,0x00,0x00,0x00,0x00,0x00,0x00,0x00,0x00,0x00,0x00,
    0x00,0x00,0x40,0x40,0x40,0x40,0x40,0x40,0x40,0x40,0x00,0x00,0x40,0x40,0x00,0x00,
    ...
    0x10,0x10,0x38,0x38,0x54,0x54,0x50,0x50,0x38,0x38,0x14,0x14,0x54,0x54,0x38,0x38,
};
The variable name should match the input file name.
You can now include the tile array in your GBDK Game Boy projects, and
load it using the set_bkg_data or set_sprite_data C functions.
$ gbtile -t rgbds -i ascii.png -o tiles.asm
2023-03-19 08:29:04,797 INFO  [gbtile] File: img/ascii.png, Tile rows: 14, columns: 16, unique colors: 2
The label name of the tiles will match the file name, will be placed in ROM, and exported for other .asm files to reference.
You'll get an output file that looks something like this:
```asm SECTION "Tiles for 'ascii'", ROM0
EXPORT ascii, ascii_end
ascii: db $00,$00,$00,$00,$00,$00,$00,$00,$00,$00,$00,$00,$00,$00,$00,$00, db $00,$00,$40,$40,$40,$40,$40,$40,$40,$40,$00,$00,$40,$40,$00,$00, db $00,$00,$6c,$6c,$24,$24,$48,$48,$00,$00,$00,$00,$00,$00,$00,$00, db $00,$00,$24,$24,$7e,$7e,$24,$24,$24,$24,$7e,$7e,$24,$24,$00,$00, ... db $00,$00,$28,$28,$00,$00,$44,$44,$44,$44,$28,$28,$10,$10,$60,$60 ascii_end:
You can assemble the file along with the rest of your project with something like:
rgbasm -L -o tiles.o tiles.asm
Once the tile data is assembled with the rest of you're project, you'll need to copy
the tiles into video memory correctly using some sort of Memcopy routine like so:
```asm ; Called at game startup InitGame: ; Call routine to initialize tile data call InitTileData ; Jump to main game loop after initializing tile data jp Main
; Initialize the tile data. In this example, we've converted a tile image ; named 'asciitiles' from gbtile, so we should have two symbols exported ; for our project to use: 'asciifiles' and 'asciitilesend', which should reference ; to the beginning and end address of the tile data in ROM. InitTileData: ; Copy tile data from the exported tile named 'asciitiles' ld de, asciitiles ; Load the tiles into the start of video memory address ld hl, $9000 ; The length of the copy is the difference between the start ; of the asciitiles symbol, and asciitilesend symbol. ld bc, asciitilesend - asciitiles call Memcopy ret
; Copy bytes from one area to another. ; @param de: Source ; @param hl: Destination ; @param bc: Length Memcopy: ld a, [de] ld [hli], a inc de dec bc ld a, b or a, c jp nz, Memcopy ret ```
For my workflow, I'm using the following image setup:
MIT Licensed.